

Our guide to brochure printing
You might think that printing a brochure or booklet is a pretty straightforward process.
But there are several factors to consider that will influence the final product.
If printing a brochure is new territory for you, we really think you’ll find this information useful, as we’ve tried our best to cover everything in one handy guide.
Follow our ultimate guide to brochure printing and you won’t go wrong.

What’s best for you?
First up, what are you looking to create?
If you need to provide your prospects or customers with quite detailed information about your products or services, you’ll most likely be in the market for a brochure or booklet with multiple pages.
If your marketing message is short and sweet, you might opt instead for a folded leaflet.
Brochures, Leaflets and Booklets
Below you will find examples of some of our most popular brochure, leaflet and booklet options available.

Folded Leaflets
Folded leaflets are perfect compact brochures. Ideal for menus or promotional print with your choice of folds. Read on for our folding guide below.

Saddle Stiched Brochures
Saddle stitching is the easy, affordable way to add a professional finish to your documents and brochures.

Perfect Bound Brochures
Perfect by name, perfect by nature. Print your projects, catalogues and brochures to the highest standard with a perfect bound finish.

Wiro Bound Brochures
For sturdy binding that’s guaranteed to stand the test of time, choose a wiro bound booklet.

Hardback Brochures
Need an upgrade? Nothing says professional like a custom printed hardback book.

Branded Notebooks
Make every note, thought, scribble and doodle count with a branded notebook. Leave a notebook with a client and leave a lasting impression too.
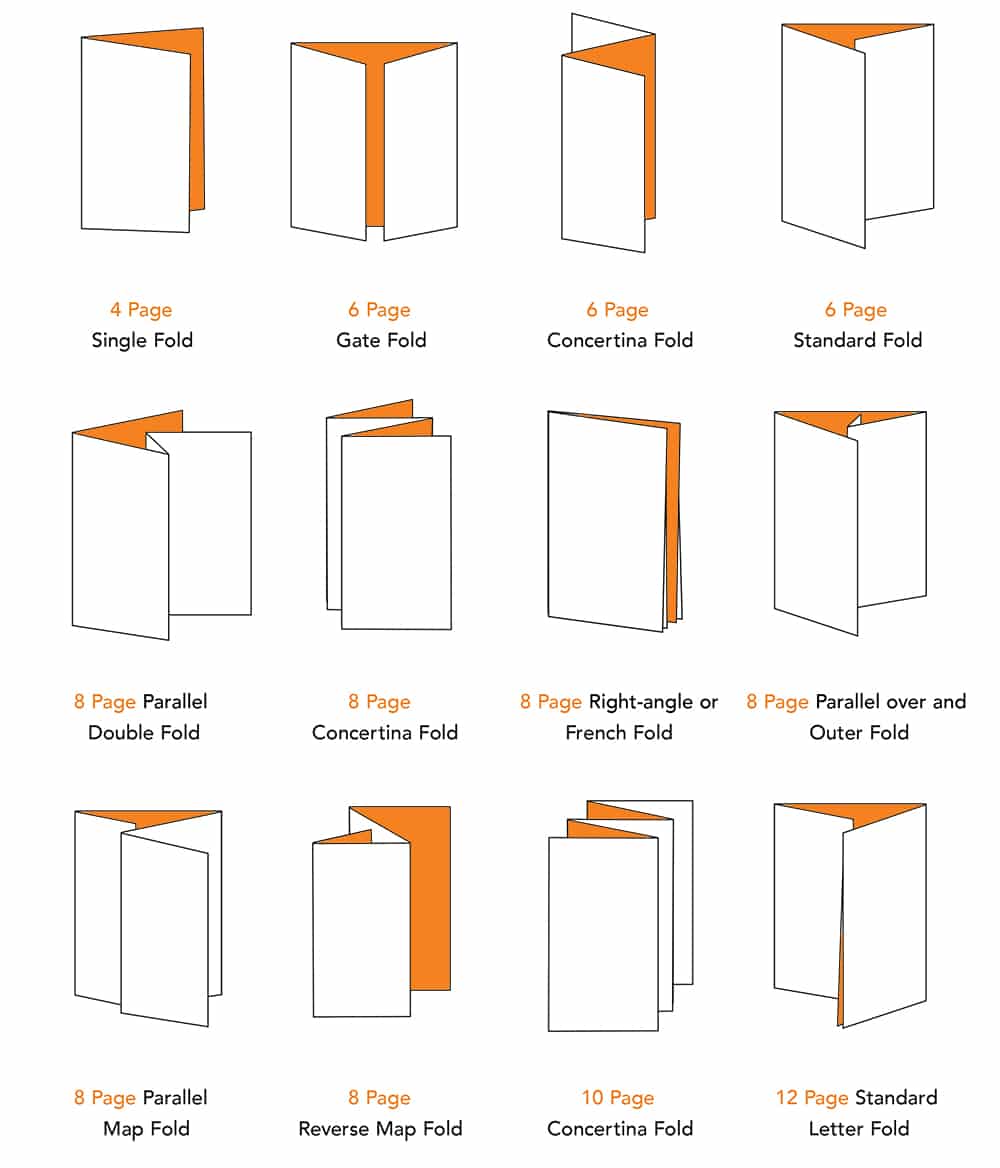
Leaflet Folds
Leaflets can be folded in all sorts of ways.
Below is a diagram that nicely illustrates some of the most popular folds for print. If you choose a folded leaflet, your designer will need to know the exact requirements so they can layout the design to align with the folds.
Brochure Size Guide
When designing a brochure for print, one of the first things you’ll need to determine is size.
Brochures of course come in all different shapes and sizes so we thought it would be handy if we shared with you some of the most common brochure sizes right here in this guide.
The good news is, we can accommodate for more bespoke requests too so please get in touch with us if you’d like to discuss your ideas in more detail.
‘A’ paper size chart

‘B’ paper size chart

You might also want to take a look at our guide to paper sizes and their many uses.
Setting up a file for print
Bleed- To ensure quality during the trimming process, a 3mm bleed is required around your artwork.
Any part of the image that runs to the edge of the page needs to run into this area. This gives the printer a small amount of space to account for movement of the paper and design inconsistencies.
Crop Marks – see the crop marks on the correct version?
Most publishing software has the ability to add the crop marks when preparing a print ready file. These give the printer a clear indication on where to trim your artwork.
The screenshot below shows the correct settings to use to set a 3mm bleed.


Bleed – the image above has bleed and is correctly setup for print. When a file is used for print, it must have a bleed of at least 3mm. The photo is the same size as the one above, but when it’s saved it’s exported with a 3mm bleed included. This helps the print finisher.

No bleed – the image above has no bleed. When a file is used for print, if no bleed is added it will cause problems at the print finishing stage when guillotining or folding.

The screenshot above illustrates the settings when a file is saved with no bleed included
Print Resolution

The good – a resolution of at least 300 dpi

The bad – anything below 300dpi could turn out blurry
Avoid a fuzzy image and achieve a good quality print by making sure you use the right resolution. It shouldn’t be any less than 300dpi (dots per inch) – the bigger the better! Saving down your folder in certain formats can impact on dpi. Be sure to double check the dpi on your saved file.
If you’re using a designer for your artwork, these are the things you need to keep an eye on before sending to print.
Colour Guide
It’s amazing how different a colour can look from your screen to the final printed version. To get around this issue you could get your hands on some printed colour charts for Pantone or CMYK – they’ll help you get the perfect colour match.
For more information take a look at our colour printing FAQs.
Did you know?
We can help with your creative. No job is too big or too small. If you wish to brief a creative concept into our studio then we’d like to start with a chat, either face-to-face or over the phone to really get to the bones of what it is you’re looking for. We’d then supply you with a couple of concepts for you to choose one to take further.

Print When You Need It
At RNB Group we pride ourselves in offering print solutions to everyone.
No job is too big or too small. That’s because we have the right kit and an expert team all under one roof.
We print around the clock to guarantee customer campaigns are delivered on time, every time.
In need of brochure printing?
We’d love to help.